mirror of
https://github.com/miguel5612/MQSensorsLib.git
synced 2025-07-03 10:51:03 +03:00
Compare commits
15 Commits
| Author | SHA1 | Date | |
|---|---|---|---|
| 39b4449899 | |||
| edd573ba0f | |||
| 6ecc769676 | |||
| e07c4b7f71 | |||
| 952a456a35 | |||
| ff0cb0562a | |||
| f8d1bcbc76 | |||
| 7c3cd5793c | |||
| 38f93037ce | |||
| b9ba249140 | |||
| a7554fa8dd | |||
| f93b5128ce | |||
| 1a14e12450 | |||
| 9bfea58092 | |||
| 555e49d31e |
120
README.md
120
README.md
@ -1,45 +1,118 @@
|
||||
<!-- PROJECT SHIELDS -->
|
||||
<!--
|
||||
*** I'm using markdown "reference style" links for readability.
|
||||
*** Reference links are enclosed in brackets [ ] instead of parentheses ( ).
|
||||
*** See the bottom of this document for the declaration of the reference variables
|
||||
*** for contributors-url, forks-url, etc. This is an optional, concise syntax you may use.
|
||||
*** https://www.markdownguide.org/basic-syntax/#reference-style-links
|
||||
-->
|
||||
[](https://zenodo.org/badge/latestdoi/170540207)
|
||||

|
||||
![Build Status][build-url]
|
||||
[![Contributors][contributors-shield]][contributors-url]
|
||||
[![Forks][forks-shield]][forks-url]
|
||||
[![Stargazers][stars-shield]][stars-url]
|
||||
[![Issues][issues-shield]][issues-url]
|
||||
[![MIT License][license-shield]][license-url]
|
||||
[![LinkedIn][linkedin-shield]][linkedin-url]
|
||||
|
||||
# MQSensorsLib
|
||||
|
||||
This is a unified library to use sensors MQ: 2, 3, 4, 5, 6, 7, 8, 9, 131, 135, 303A and 309A.
|
||||
|
||||
<!-- TABLE OF CONTENTS -->
|
||||
## Table of Contents
|
||||
|
||||
* [Getting Started](#Getting-Started)
|
||||
* [Wiring](#Wiring)
|
||||
* [Sensor](#Sensor)
|
||||
* [Arduino](#Arduino)
|
||||
* [ESP8266](#ESP8266)
|
||||
* [User Manual](#usage)
|
||||
* [Sensor manufacturers](#Sensor-manufacturers)
|
||||
* [Contributing](#Contributing)
|
||||
* [Authors](#Authors)
|
||||
|
||||
## Getting Started
|
||||
|
||||
```
|
||||
#define placa "Arduino UNO"
|
||||
#define Voltage_Resolution 5
|
||||
#define pin A0 //Analog input 0 of your arduino
|
||||
#define type "MQ-4" //MQ4
|
||||
#define ADC_Bit_Resolution 10 // For arduino UNO/MEGA/NANO
|
||||
MQUnifiedsensor MQ4(placa, Voltage_Resolution, ADC_Bit_Resolution, pin, type); //Example if sensor is MQ4 on Arduino UNO board
|
||||
//Include the library
|
||||
#include <MQUnifiedsensor.h>
|
||||
/************************Hardware Related Macros************************************/
|
||||
#define Board ("Arduino UNO")
|
||||
#define Pin (A4) //Analog input 4 of your arduino
|
||||
/***********************Software Related Macros************************************/
|
||||
#define Type ("MQ-4") //MQ4
|
||||
#define Voltage_Resolution (5)
|
||||
#define ADC_Bit_Resolution (10) // For arduino UNO/MEGA/NANO
|
||||
#define RatioMQ4CleanAir (4.4) //RS / R0 = 60 ppm
|
||||
/*****************************Globals***********************************************/
|
||||
//Declare Sensor
|
||||
MQUnifiedsensor MQ4(Board, Voltage_Resolution, ADC_Bit_Resolution, Pin, Type);
|
||||
// Setup
|
||||
MQ4.setRegressionMethod("Exponential"); //_PPM = a*ratio^b
|
||||
MQ4.setA(1012.7); MQ4.setB(-2.786); // Configurate the ecuation values to get CH4 concentration
|
||||
MQ4.setR0(3.86018237);
|
||||
MQ4.setR0(3.86018237); // Value getted on calibration
|
||||
// Loop
|
||||
MQ4.init();
|
||||
MQ4.update();
|
||||
float ppmCH4 = MQ4.readSensor();
|
||||
```
|
||||
|
||||
## Wiring
|
||||
|
||||
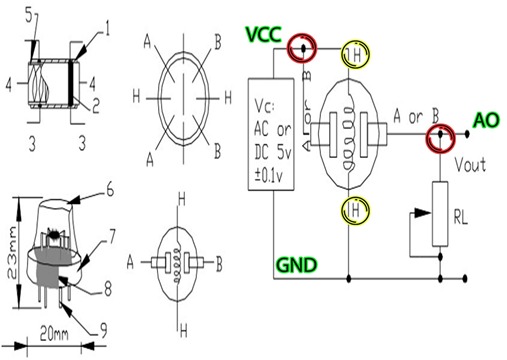
### Sensor
|
||||
#### Important points:
|
||||
##### Points you should identify
|
||||
* VCC -> 5V Power supply (+) wire
|
||||
* GND -> GND Ground (-) wire
|
||||
* AO -> Analog Output of the sensor
|
||||
##### Data of board that you should have
|
||||
* RL Value in KOhms
|
||||
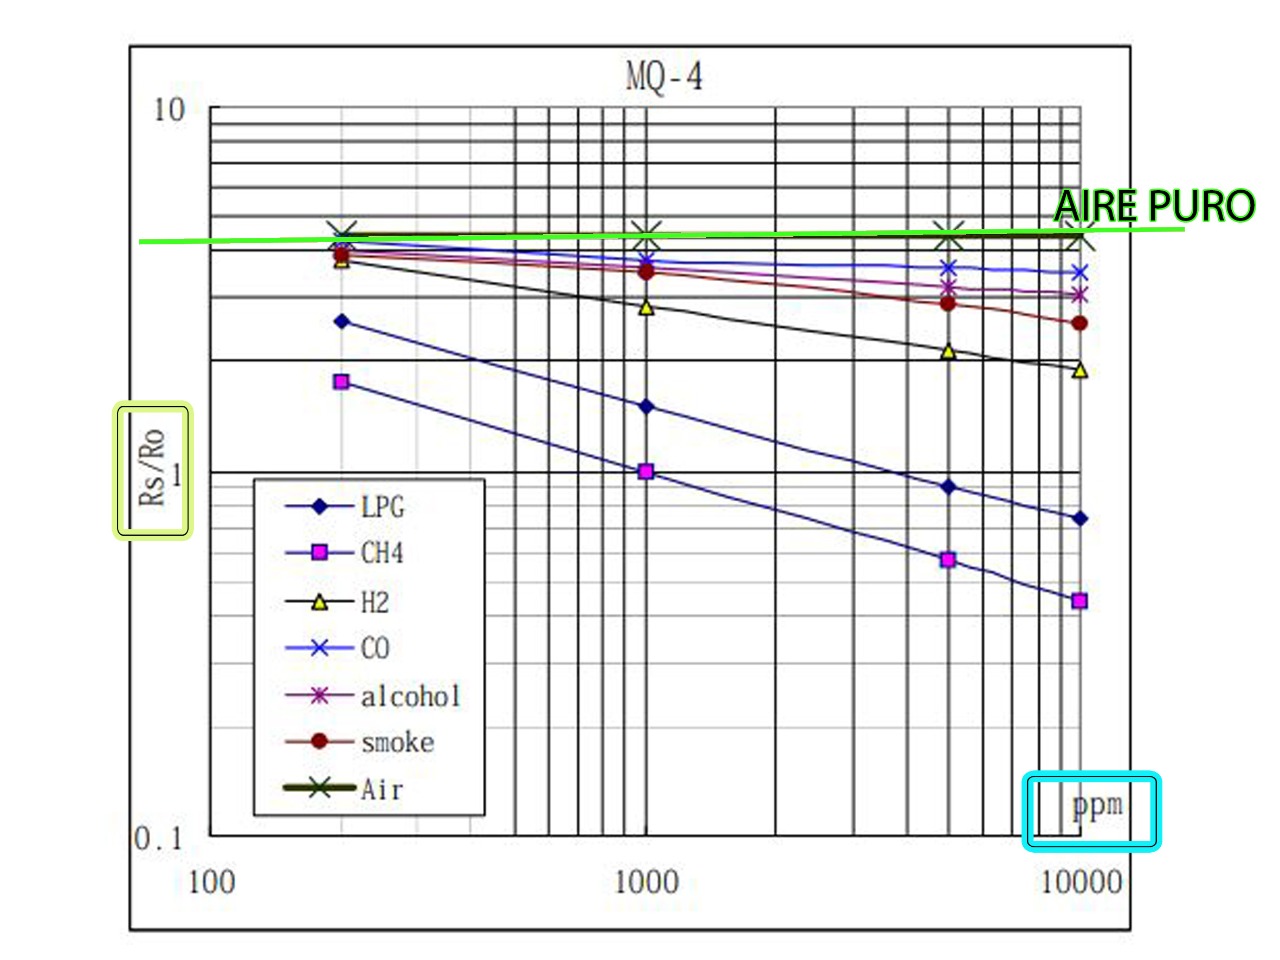
##### Graph
|
||||
|
||||
#### RS/R0 value (From datasheet of your sensor)
|
||||
* RS/R0 (Clean air - English) -> (Aire puro - Spanish)
|
||||
* **Note**: RS/R0 is equal to Ratio variable on the program
|
||||
|
||||
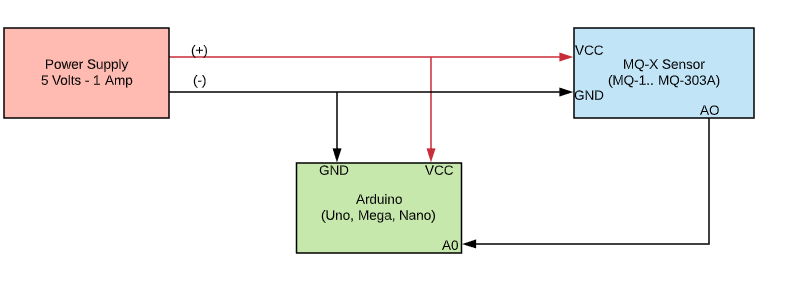
### Arduino
|
||||
|
||||
|
||||
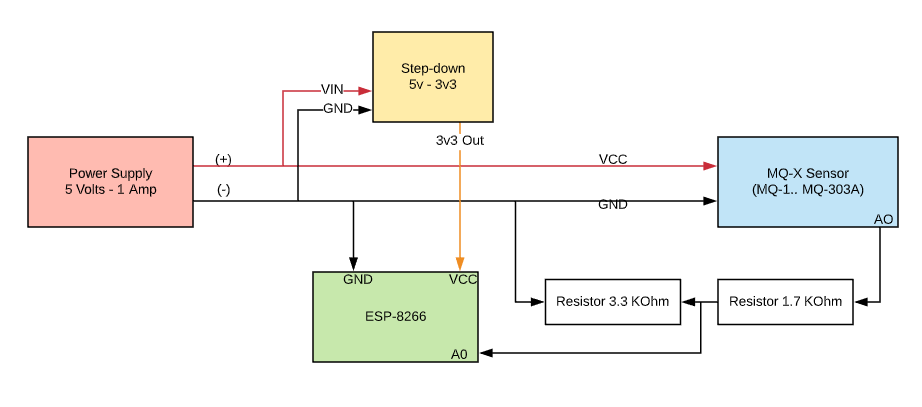
### ESP8266
|
||||
|
||||
|
||||
### User Manual New!! 12.2019
|
||||
### User Manual (v1.0) 12.2019
|
||||
[Manual](https://drive.google.com/open?id=1BAFInlvqKR7h81zETtjz4_RC2EssvFWX)
|
||||
### User Manual (v2.0) 04.2020
|
||||
[Manual](https://github.com/miguel5612/MQSensorsLib_Docs/blob/master/Docs/MQSensorLib_2.0.pdf)
|
||||
|
||||
[Excel_Help_Spreadsheet (Fill only Volaje Between RL - RS - RL Values)](https://drive.google.com/open?id=1MKDcudQ7BHL_vLGi-lgPh9-pblvygRMq)
|
||||
|
||||
### Serial debug (optional)
|
||||
If your sensor is an **MQ2** (Same for others sensors):
|
||||
* To enable on setup wrote
|
||||
```
|
||||
MQ2.serialDebug(true);
|
||||
```
|
||||
* And on Loop Wrote
|
||||
```
|
||||
MQ2.serialDebug();
|
||||
```
|
||||
* Result:
|
||||
|
||||

|
||||
|
||||
**Note**:
|
||||
*  `Yellow -> Calibration status.`
|
||||
*  `Green -> Hardware and software characteristics.`
|
||||
*  `Red -> Headers of the library calculations.`
|
||||
* Only valid for **1** gas sensor readings.
|
||||
|
||||
**Usage**
|
||||
* Quick troubleshooting, since it shows everything the library does and the results of the calculations in each function.
|
||||
|
||||
### Prerequisites
|
||||
|
||||
You'll need Arduino desktop app 1.8.9 or later.
|
||||
|
||||
### Sensor manufacture:
|
||||
### Sensor manufacturers:
|
||||
| Sensor | Manufacture | URL Datasheet |
|
||||
|----------|----------|----------|
|
||||
| MQ-2 | Pololulu| [datasheet](https://www.pololu.com/file/0J309/MQ2.pdf) |
|
||||
@ -105,8 +178,8 @@ Please read [CONTRIBUTING.md](https://github.com/miguel5612/MQSensorsLib/blob/ma
|
||||
|
||||
## Collaborators
|
||||
|
||||
* **Andres A. Martinez.**
|
||||
* **Juan A. Rodríguez.** - [*Github*](https://github.com/Obiot24)
|
||||
* **Andres A. Martinez.** - [*Github*](https://github.com/andresmacsi) - [CV](https://www.linkedin.com/in/andr%C3%A9s-acevedo-mart%C3%ADnez-73ab35185/?originalSubdomain=co)
|
||||
* **Juan A. Rodríguez.** - [*Github*](https://github.com/Obiot24) - [CV]()
|
||||
* **Mario A. Rodríguez O.** - [*GitHub*](https://github.com/MarioAndresR) - [CV](https://scienti.colciencias.gov.co/cvlac/visualizador/generarCurriculoCv.do?cod_rh=0000111304)
|
||||
|
||||
See also the list of [contributors](https://github.com/miguel5612/MQSensorsLib/contributors) who participated in this project.
|
||||
@ -158,3 +231,22 @@ This project is licensed under the MIT License - see the [LICENSE.md](LICENSE.md
|
||||
doi = {10.5281/zenodo.3384301},
|
||||
url = {https://doi.org/10.5281/zenodo.3384301}
|
||||
}
|
||||
|
||||
|
||||
|
||||
<!-- MARKDOWN LINKS & IMAGES -->
|
||||
<!-- https://www.markdownguide.org/basic-syntax/#reference-style-links -->
|
||||
[contributors-shield]: https://img.shields.io/github/contributors/miguel5612/MQSensorsLib.svg?style=flat-square
|
||||
[contributors-url]: https://github.com/miguel5612/MQSensorsLib/graphs/contributors
|
||||
[forks-shield]: https://img.shields.io/github/forks/miguel5612/MQSensorsLib.svg?style=flat-square
|
||||
[forks-url]: https://github.com/miguel5612/MQSensorsLib/network/members
|
||||
[stars-shield]: https://img.shields.io/github/stars/miguel5612/MQSensorsLib.svg?style=flat-square
|
||||
[stars-url]: https://github.com/miguel5612/MQSensorsLib/stargazers
|
||||
[issues-shield]: https://img.shields.io/github/issues/miguel5612/MQSensorsLib.svg?style=flat-square
|
||||
[issues-url]: https://github.com/miguel5612/MQSensorsLib/issues
|
||||
[license-shield]: https://img.shields.io/github/license/miguel5612/MQSensorsLib.svg?style=flat-square
|
||||
[license-url]: https://github.com/miguel5612/MQSensorsLib/blob/master/LICENSE.txt
|
||||
[linkedin-shield]: https://img.shields.io/badge/-LinkedIn-black.svg?style=flat-square&logo=linkedin&colorB=555
|
||||
[build-url]: https://travis-ci.org/dwyl/esta.svg?branch=master
|
||||
[linkedin-url]: https://www.linkedin.com/in/miguel5612
|
||||
[product-screenshot]: images/screenshot.png
|
||||
|
||||
93
examples/ESP32/esp32.ino
Normal file
93
examples/ESP32/esp32.ino
Normal file
@ -0,0 +1,93 @@
|
||||
// This is an example of implementation using ESP8266
|
||||
// Never connect the sensor direct to the ESP8266, sensor high level is 5V
|
||||
// ADC of ESP8266 high level is 3.3
|
||||
// To connect use a voltage divisor, where 5V will 3v3 on the middle point like
|
||||
// this {{URL}}
|
||||
|
||||
/*
|
||||
MQUnifiedsensor Library - reading an MQSensor using ESP8266 board
|
||||
|
||||
For this example wi will demonstrates the use a MQ3 sensor.
|
||||
Library originally added 01 may 2019
|
||||
by Miguel A Califa, Yersson Carrillo, Ghiordy Contreras, Mario Rodriguez
|
||||
|
||||
Added ESP8266 example
|
||||
29.03.2020
|
||||
Wiring:
|
||||
https://github.com/miguel5612/MQSensorsLib_Docs/blob/master/static/img/MQ_ESP8266.PNG
|
||||
|
||||
This example code is in the public domain.
|
||||
|
||||
*/
|
||||
|
||||
//Include the library
|
||||
#include <MQUnifiedsensor.h>
|
||||
/************************Hardware Related Macros************************************/
|
||||
#define Board ("ESP-32") // Wemos ESP-32 or other board, whatever have ESP32 core.
|
||||
#define Pin (25) //IO25 for your ESP32 WeMos Board, pinout here: https://i.pinimg.com/originals/66/9a/61/669a618d9435c702f4b67e12c40a11b8.jpg
|
||||
/***********************Software Related Macros************************************/
|
||||
#define Type ("MQ-3") //MQ3 or other MQ Sensor, if change this verify your a and b values.
|
||||
#define Voltage_Resolution (3.3) // 3V3 <- IMPORTANT. Source: https://randomnerdtutorials.com/esp32-adc-analog-read-arduino-ide/
|
||||
#define ADC_Bit_Resolution (12) // ESP-32 bit resolution. Source: https://randomnerdtutorials.com/esp32-adc-analog-read-arduino-ide/
|
||||
#define RatioMQ3CleanAir (60) // Ratio of your sensor, for this example an MQ-3
|
||||
/*****************************Globals***********************************************/
|
||||
MQUnifiedsensor MQ3(Board, Voltage_Resolution, ADC_Bit_Resolution, Pin, Type);
|
||||
/*****************************Globals***********************************************/
|
||||
|
||||
void setup() {
|
||||
//Init the serial port communication - to debug the library
|
||||
Serial.begin(9600); //Init serial port
|
||||
|
||||
//Set math model to calculate the PPM concentration and the value of constants
|
||||
MQ3.setRegressionMethod(1); //_PPM = a*ratio^b
|
||||
MQ3.setA(4.8387); MQ3.setB(-2.68); // Configurate the ecuation values to get Benzene concentration
|
||||
/*
|
||||
Exponential regression:
|
||||
Gas | a | b
|
||||
LPG | 44771 | -3.245
|
||||
CH4 | 2*10^31| 19.01
|
||||
CO | 521853 | -3.821
|
||||
Alcohol| 0.3934 | -1.504
|
||||
Benzene| 4.8387 | -2.68
|
||||
Hexane | 7585.3 | -2.849
|
||||
*/
|
||||
|
||||
/***************************** MQ Init ********************************************/
|
||||
//Remarks: Configure the pin of arduino as input.
|
||||
/************************************************************************************/
|
||||
MQ3.init();
|
||||
|
||||
/*
|
||||
//If the RL value is different from 10K please assign your RL value with the following method:
|
||||
MQ3.setRL(10);
|
||||
*/
|
||||
/***************************** MQ CAlibration ********************************************/
|
||||
// Explanation:
|
||||
// In this routine the sensor will measure the resistance of the sensor supposing before was pre-heated
|
||||
// and now is on clean air (Calibration conditions), and it will setup R0 value.
|
||||
// We recomend execute this routine only on setup or on the laboratory and save on the eeprom of your arduino
|
||||
// This routine not need to execute to every restart, you can load your R0 if you know the value
|
||||
// Acknowledgements: https://jayconsystems.com/blog/understanding-a-gas-sensor
|
||||
Serial.print("Calibrating please wait.");
|
||||
float calcR0 = 0;
|
||||
for(int i = 1; i<=10; i ++)
|
||||
{
|
||||
MQ3.update(); // Update data, the arduino will be read the voltage on the analog pin
|
||||
calcR0 += MQ3.calibrate(RatioMQ3CleanAir);
|
||||
Serial.print(".");
|
||||
}
|
||||
MQ3.setR0(calcR0/10);
|
||||
Serial.println(" done!.");
|
||||
|
||||
if(isinf(calcR0)) {Serial.println("Warning: Conection issue founded, R0 is infite (Open circuit detected) please check your wiring and supply"); while(1);}
|
||||
if(calcR0 == 0){Serial.println("Warning: Conection issue founded, R0 is zero (Analog pin with short circuit to ground) please check your wiring and supply"); while(1);}
|
||||
/***************************** MQ CAlibration ********************************************/
|
||||
MQ3.serialDebug(true);
|
||||
}
|
||||
|
||||
void loop() {
|
||||
MQ3.update(); // Update data, the arduino will be read the voltage on the analog pin
|
||||
MQ3.readSensor(); // Sensor will read PPM concentration using the model and a and b values setted before or in the setup
|
||||
MQ3.serialDebug(); // Will print the table on the serial port
|
||||
delay(500); //Sampling frequency
|
||||
}
|
||||
@ -23,12 +23,12 @@
|
||||
//Include the library
|
||||
#include <MQUnifiedsensor.h>
|
||||
/************************Hardware Related Macros************************************/
|
||||
#define Board ("Arduino UNO")
|
||||
#define Board ("ESP8266")
|
||||
#define Pin (A0) //Analog input 3 of your arduino
|
||||
/***********************Software Related Macros************************************/
|
||||
#define Type ("MQ-3") //MQ3
|
||||
#define Voltage_Resolution (3.3) // 3V3 <- IMPORTANT
|
||||
#define ADC_Bit_Resolution (10) // For arduino UNO/MEGA/NANO
|
||||
#define ADC_Bit_Resolution (10) // For ESP8266
|
||||
#define RatioMQ3CleanAir (60)
|
||||
/*****************************Globals***********************************************/
|
||||
MQUnifiedsensor MQ3(Board, Voltage_Resolution, ADC_Bit_Resolution, Pin, Type);
|
||||
|
||||
@ -1,5 +1,5 @@
|
||||
name=MQUnifiedsensor
|
||||
version=2.0
|
||||
version=2.0.1
|
||||
author= Miguel Califa <miguelangel5612@gmail.com>, Yersson Carrillo<miguelangel5612@gmail.com>, Ghiordy Contreras<miguelangel5612@gmail.com>
|
||||
maintainer= Miguel Califa <miguelangel5612@gmail.com>
|
||||
sentence= This library allows you to read the MQ sensors very easily.
|
||||
|
||||
@ -27,7 +27,7 @@ void MQUnifiedsensor::setRL(float RL) {
|
||||
}
|
||||
void MQUnifiedsensor::setADC(int value)
|
||||
{
|
||||
this-> _sensor_volt = (value) * _VOLT_RESOLUTION / (pow(2, ADC_RESOLUTION) - 1);
|
||||
this-> _sensor_volt = (value) * _VOLT_RESOLUTION / ((pow(2, _ADC_Bit_Resolution)) - 1);
|
||||
this-> _adc = value;
|
||||
}
|
||||
void MQUnifiedsensor::setVoltResolution(float voltage_resolution)
|
||||
@ -95,7 +95,7 @@ void MQUnifiedsensor::serialDebug(bool onSetup)
|
||||
}
|
||||
else
|
||||
{
|
||||
Serial.print("|"); Serial.print(_adc); Serial.print("| v = ADC*"); Serial.print(_VOLT_RESOLUTION); Serial.print("/"); Serial.print(pow(2, _ADC_Bit_Resolution)); Serial.print(" | "); Serial.print(_sensor_volt);
|
||||
Serial.print("|"); Serial.print(_adc); Serial.print("| v = ADC*"); Serial.print(_VOLT_RESOLUTION); Serial.print("/"); Serial.print((pow(2, _ADC_Bit_Resolution)) - 1); Serial.print(" | "); Serial.print(_sensor_volt);
|
||||
Serial.print(" | RS = ((" ); Serial.print(_VOLT_RESOLUTION ); Serial.print("*RL)/Voltage) - RL| "); Serial.print(_RS_Calc); Serial.print(" | Ratio = RS/R0| ");
|
||||
Serial.print(_ratio); Serial.print( " | ");
|
||||
if(_regressionMethod == 1) Serial.print("ratio*a + b");
|
||||
@ -174,7 +174,7 @@ float MQUnifiedsensor::getVoltage(int read) {
|
||||
avg += _adc;
|
||||
delay(retry_interval);
|
||||
}
|
||||
voltage = (avg/ retries) * _VOLT_RESOLUTION / (pow(2, ADC_RESOLUTION) - 1);
|
||||
voltage = (avg/ retries) * _VOLT_RESOLUTION / ((pow(2, _ADC_Bit_Resolution)) - 1);
|
||||
}
|
||||
else
|
||||
{
|
||||
|
||||
Reference in New Issue
Block a user